After being an avid Firefox fan for the past five years I’ve recently
decided to switch to Google Chrome as my main browser for both
development and general usage. It’s matured over the last few years to
become a great browser; fast, light on resources and with a brilliant
plugin system.
When using Firefox, the Firebug extension has become an
invaluable tool for debugging, diagnosing and investigating front end
HTML, Javascript and CSS issues. Chrome has an equivalent feature built
right into the browser and its great, except for one thing; The
checkboxes used to toggle properties in the CSS inspector are the on
wrong side.
The problem
Here’s the CSS inspector in Firebug:

Notice how the
button to toggle the CSS properties on and off is right next to the
property name itself. This close proximity makes it easy for the brain
to associate it to the height property. Now lets look at the equivalent
feature in Chrome developer tools:
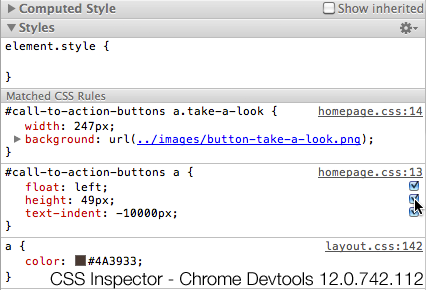
The button to toggle
the property is now a tiny checkbox placed way out on the right hand
side. The distance between the checkbox and the CSS property means that
its difficult to work out which checkbox applies to which property.
Paul Fitts would be having a fit.
The fix
After 2 minutes of playing around I realised the DevTools in Chrome are
actually plain old HTML, CSS and JavaScript. The CSS file is located at
chrome-devtools://devtools/devTools.css, I didn’t want to find this
file in the application package and directly edit it as my changes would
get overwritten on each upgrade.
I started looking into plugins such as
Stylish which let you inject custom CSS in any page you like.
However Chrome plugins are only loaded in pages using http://, https://
or ftp:// protocols (and file://, if given permission by the user).
Eventually I came across the Custom.css which is Chrome’s equivalent to
Firefox’s userContent.css. Custom.css gets injected to all pages in
Chrome, even the extension management page, user preferences and of
course DevTools.
Updating Custom.CSS
On OS X you can find your Custom.css file in
~/Library/Google/Chrome/Default/User StyleSheets/. If that folder is
empty just create the file yourself. I don’t use Windows but I’m sure
the file will be in a similar place. Place the following CSS in the file
and save.
That’s all there is to it. You don’t even need to restart Chrome.
I’m not sure if this will ever get properly fixed. It’s been raised as an
issue in the Chromium project but it’s been marked as an external
dependancy issue within the WebKit engine. The WebKit team don’t seem to
be in any hurry to fix it either, it’s been sitting as an issue in
their bug tracker for over a year with no real activity.
I’ve always got a side project on the go, I enjoy doing something a bit
different from my usual day job and working with electronics (especially
LEDs) can be pretty interesting.
Back in 2004, Daft Punk designed a
coffee table for Habitat which featured a 5x5 grid of red LEDs mounted
under smoked glass which would light up and animate in time with an
external music source. I always wanted one of these but could never
afford it. Fast forward to 2009 and a few people started building 8x8
LED matrix coffee tables. These featured 64 RGB LEDs arranged in a 8 by
8 pattern which would animate and generally look awesome. Soon after
that people started adding touch sensing capabilities to tables to
enable some cool interactive effects. I want to draw from all these
projects and build my own ultimate LED coffee table.
Here’s a little
spec I put together:
- 8x8 RGB LED matrix to display simple animations, effects (e.g plasma
demo).
- Synced to external music source.
- Multitouch capable.
- Gesture-based interface.
- Completely standalone operation - Table doesn’t need to be plugged
into a PC. The only wire connected will be the power supply.
- Remote control via iPhone over WiFi.*
* This last feature depends on how much time I have free to program
it.
Getting started

The base of the table will be formed out of an Ikea
Magiker coffee table.These haven’t been on sale for the past few years
but my old flatmate generously donated his for the project. They are
almost the perfect size (75cm x 75xm x 45cm) but I’m still going to be
making some modifications. The two open ends will be boarded up to stop
light leakage and then the sides clad in clear 6mm Perspex. The Perspex
will have a white vinyl backing on the inside giving it a similar effect
to the first generation iPod Nano and Nintendo DS Lite. Inside the table
I’m constructing a 8x8 grid out of 1mm PVC foamboard to divide up each
LED and form what I’m calling a “cell”. I’ll probably replace the
original glass top which has a frosted border with some low iron clear
stuff which doesn’t have that usual green tint you get with glass. Where
the glass sits on the wood I’m going to add a white rubber strip to form
a (fairly) watertight seal, just in case a drink gets knocked over on
top, I don’t want it seeping down into the electronics. The final
element is the diffusion film to even out the LEDs, I’ve found some
white frosted self adhesive film which works a treat.
Driving the LEDs
In a RGB LED matrix, each LED is actually three combined in a single
package, this means that in a 8x8 matrix there’s 192 LEDs to drive.
Rather than trying to power all LEDs at once with some crazy power
hungry LED driver, I’ll instead be using a multiplexing approach. This
technique involves only lighting one column at a time, by switching very
quickly between the columns your brain perceives that they are
constantly on due to persistence of vision. I’ll be using a Rainbowduino
to drive the LED array, being controlled by the main Arduino over I2C.
Each cell will have three 10mm diffused RGB LEDs. The cheap Chinese LEDs
which I’ve purchased, although bright, aren’t particularly high quality
and the colour varies slightly between each one. By using three in a
cell running at a slightly lower power I’m hoping to even out this
problem (even though it means a load more soldering). It also evens out
the light spread so there’s no bright spots on the diffusion film.
Touch sensitivity
A capacitive or resistive panel on this scale would be too expensive for
my budget so I’ve decided to go for a low tech optical solution
involving infrared light. Each cell will have a IR LED and a matching IR
photodiode. The LED will fire infrared light up out of the cell, if
something is placed above it (a hand / cup / face), the IR light is
bounced back and detected by the photodiode. At least that’s how it
should work in theory. I’m expecting lot of problems with crosstalk
(where adjacent cells are detecting their neighbours reflected light),
reduced IR emission (due to the light diffusion film on the bottom of
the glass) and interference from ambient lighting.
Each photodiode would
will need to be connected to an analog pin on the Arduino to take a
reading. Since the the Arduino doesn’t have 64 analog inputs I’ll be
using an eight channel demultiplexer and an eight channel multiplexer to
achieve this. The multiplexer supply power to one column at a time via a
transistor. The demultiplexer will be connected to the photodiodes on
each row. Working much like the LEDs, only one column is on at a time.
This allows the demux to read each row individually, the next column is
lit up and another reading taken. This happens over and over, scanning
the entire table around 20 times a second.
Syncing to music
They key to syncing lights to music is beat detection. A kick drum
(which in most dance music sounds on the beat) is in the 60–120hz
frequency area, by using a filter it’s possible to pull out just that
frequency from an audio source and then do something when it happens. I
spent a bit of time looking into active and passive low pass filters and
beat detection and it turns out it’s a lot harder than first appears.
Luckily I came across the MSGEQ7 chip; it takes a line level input and
reports back the amplitude of seven different frequency bands. It has a
built in demultiplexer so it only takes up 3 pins on the Arduino. One of
the bands is 63hz which means I can do the beat detection very easily.
Another positive about this approach is that I can include a graphic
equaliser animation mode without needing to plug the table into a PC
running a Processing sketch. I’ve bought a little pre-built board with
an electret mic, built in pre-amp and gain control to feed into the
MSGEQ7.
This post summarises where I’m at with the initial design of the
Disco Table. I’ve started ordering parts in for the construction
process. My next post will outline my progress on modifying the Ikea
table and some prototype circuits I’ve built on a breadboard.
(Update 4th May: The recent Firefox 4.0.1 update has caused issues with
my original workaround, Ive now made changes below so that the plugin
continues working even after future updates)
I’m now using Firefox 4 RC
as my main browser; it’s stable, fast and the UI changes feel like a big
step forward. I haven’t had much problem getting my addons working but
the delicious bookmarking extension didn’t want to play ball. I use it
on a daily basis (check out my last few bookmarks over on the right hand
sidebar) so this was a real dealbreaker for me.
After a bit of searching
on Google I couldn’t find a simple tutorial so I thought I’d put this
one together and help out anybody else looking for a solution to this
problem. Please note, this is for OSX but the process will be very
similar on Windows too. I’m also assuming you have upgraded from FF 3.6
and already had the delicious extension installed. If not you might need
to download/install it before taking the following steps.
- From the menus select Help > Troubleshooting information
- On this new tab, near the top, you’ll see a field called Profile
Directory. Click the button in the field to launch Finder (File
Explorer for Windows).
- In the window which has popped up navigate to the extensions folder.
Inside that should be another folder named
“{2fa4ed95–0317–4c6a-a74c–5f3e3912c1f9}”. Inside this is a file
called install.rdf
- Open install.rdf in any plain text editor.
- Around line 8 you should see some XML which looks like this:
em:maxVersion="4.0b3pre" />
- Update this to
em:maxVersion="5.0" /> (See we changed “4.0b3pre”
to “5.0”)
- Save the file and restart Firefox.
- Boom. The delicious extension will now work.
The toolbar icons look a little funky and don’t fit the new UI in FF4
but apart from that it seems to work perfectly and should keep you going
until delicious release their own update for FF4.
It’s been a long time coming but this weekend I finally got round to finishing off my WordPress theme and, as you can see, have now got it live. This new design also includes a drastic restructuring of the content within my site. Previously the homepage was just a list of my most recent blog posts but I wanted it to speak to potential clients and employers so Ive introduced a new layout outlining who I am and what I do. Hopefully it should give a clearer overview to new visitors who want to find out more.
Ive also made quite a few technical changes, here’s an overview of the most important ones:
- HTML5 markup. I've used the Starkers theme as a base and built on top of it with the Toucan reset stylesheet (I've added a few tweaks to handle the new HTML5 elements). I'm also using Modernizr 1.6 to help older browsers to deal with the HTML5 pages properly. It's refreshing to use HTML5 after working with XHTML Strict for years, rather than worrying about ridiculous validation rules you can get on and make great looking sites.
- Minified and combined my external CSS and JS to make the pages load a bit quicker. Apache is also gzipping everything. Currently my Google page speed ranking is 93, I could improve upon this but it quickly becomes a game of diminishing returns (No, Google I don't want to run every PNG on the site through pngcrush just to save 93 bytes) and the pages are generally loading below 500ms anyway which is acceptable.
- Web fonts - You'll notice the familiar (and probably overused) but brilliant Museo Sans for headings and titles. This is courtesy of CSS3's powerful @font-face.
There’s still a bit more work to do; I’d like to make my social media links more prominent by placing them on every page and introduce a jQuery powered image slider on the homepage but this will have to wait until I have another spare few hours.
Any feedback in the comments is greatly appreciated.
I’ve always found name generators pretty funny, the ones where you enter
your real name and it gives you a comedy name based on a certain subject
like Brazilian footballers or Jedi knights.
A year or so ago,
myself and a friend were trying to come up with names for our DJ
partnership and I put together this electro DJ name generator as a
bit of fun using parts of the names of popular acts at the time. It
combines them together with pretty hilarious results. Here’s a few of my
favourite:
- Fantasy French
- Horrorwax
- Mr DJ
- Diabolical Crunk
Warning: Potentially NSFW
The Trendy Electro DJ Name
Generator.
Make sure you post your favourite
results in the comments.
